Shopping Cart
0 item(s) - $0.0017mm DrJones H17Fx Driver w/ lucidrv2 - 7135 + FET
Availability: 149
10 or more $15.99
Add to Compare
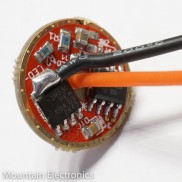
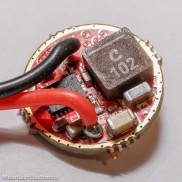
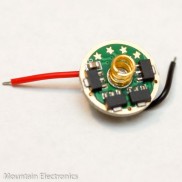
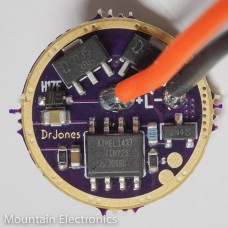
This super-advanced driver, designed by DrJones, is extremely advanced, with triple-channel output (2x7135 channels; 1xFET channel), seamless temperature sensor function and full user programmability.
The PCBs for this revision are blue instead of purple.
Specifications
- 17mm Diameter
- 3V-4.35V Input Voltage
- Triple-Channel Output
- 2x 7135 Channels; Up to 3A Constant Current Regulation
- 1x FET/Direct Drive Channel; Non-regulated Output
- 22 AWG Silicone Wires Pre-Soldered (included standard, but can be removed).
- Spring Options:
- No Spring
- Brass Button
- QLITE Spring
This is a custom driver board (H17F) with an enhanced version of lucidrv with some additional features. It has a diameter of 17mm with components on both sides, and provides a current of 3.0A (8*AMC7125) plus a direct drive FET for turbo modes.
Low modes (up to 13%) are driven by a single AMC7135 IC (380mA), which allows very low moonlight/firefly modes and makes those modes also quite efficient (the LED is more efficient at lower currents). Medium and high modes up to 3.0A are driven by additional 7*AMC7135. The direct drive FET allows for turbo modes of 5A and more - but that depends on the battery (use a high drain cell with low internal resistance) and on internal resistaces of the flashlight (contacts, wires, springs, switch, and the forward voltage of the LED).
- Off-Time memory: The driver distinguishes between being off for a short tap (half-press) on the clicky to change to the next mode and being switched off for a longer time (~0.5s) so that memory kicks in (or no-memory if configured that way).
- Two mode groups: There are two easily switchable mode groups for different situations (e.g. one for indoors with moon and low modes, and one for outdoors with high/med). Each group is fully configurable with up to 7 modes and it's own memory type (see below).
- Programming: Each mode can be configured to a one of the 24 available (visually linear) levels of brightness. There are also some special functions which can be configured to any brightnes level, too: strobe, beacon or double-pulse blink. The number of modes (1-7) and the memory type can be configured for each group.
- Memory:No-memory, classic memory or short-cycle memory configurable for each mode group.
- Double-Tap mode: A quick double-tap leads to an additional (programmable) mode (e.g. high or strobe) for each group. It can also be activated fromm off by a tap immediately after clicking on (click-tap; for reverse clickies), or by a tap immediately before clicking the light on (tap-click; for forward clickies)
- Mode locking: Select any mode and use it for a second, then activate mode lock (see below). Then that mode is locked, it won't change to next mode any more (unless you unlock it again). Good for tactical or signaling purpose.
- Full thermal control: The driver monitors the temperature and reduces power to avoid overheating. The power is constantly adjusted to keep the set temperature constant (PID control): If the light gets hot, the power is reuced, but if for example a better airflow enhances cooling, the power increases again. The driver constantly adapts to the cooling conditions; the better the cooling is, the brighter it will be. The target temperature can be configured in steps of 5°C, and thermal control can also be deactivated.
Note that the temperature is measured at the driver and will be somewhere between the LED's and the body's temperature. It will reach the set temperature and start regulating down the power before the body reaches it's equilibrium temperature, which will also be lower than the (driver's) set temperature. Note also that the absolute accuracy of the temperature sensor is about +- 5°C
The set temperature may be exceeded for a short time after changing to a high power mode when the light is already near it's set temperature, since activating a high power mode is supposed to give high power at least for a short time. The driver will soon start regulating down to reach the set temperature again. - Bump proof: If mounted on a bike, bumps may cause the battery to loose contact to the driver for a very short moment, which many drivers interpret as a button tap and change modes. This driver however ignores those bumps and keeps it's mode.
- Battery monitoring: Whenever the battery falls below 3V under load, brightness is reduced (about half). The reduced load usually brings up the voltage a bit. When it drops below 3V again, brightness is halved again - and so on, down to a very low level. It will not switch off and leave you in complete darkness though.
- Voltage indicator: The driver can show the battery status via some blinks; see below.
- Efficiency: The luminous efficacy of the all modes except the highest 6 brightness levels is increased by using a truly lower current (triple channel design with a low current and two high current channels).
- Lower levels: The triple channel design also allows for a higher dynamic range of brightness levels (12 bit), i.e. more lower levels.
- Turbo levels: The additional direct drive FET channel allows for quite high currents for the two turbo modes: full turbo and an intermediate half-turbo. Actual currents depend on the battery and the flashlight hardware.
- 16 kHz PWM frequency: Invisible and inaudible.
Configuration menu (programming mode): Select a mode and use it for at least a second. That mode is then the selected mode for some of the actions below. Then enter programming mode by 8 rapid taps (half-presses; the light must be <0.2s on each time). You have to be quite fast, however it's no problem if you tap a few times more.
Shortly after those rapid taps a blinking signal will be shown. This serves two purposes: It indicates that the light is now in its configuration menu (programming mode) and awaits further input, and it also serves as battery level indicator: The number of blinks indicates battery voltage, about one blink for every 0.12V above 3.0V without load (~10 is full (4.2V), ~4 is pretty empty). If you let them pass without tapping the button again, the config menu is exited without any change.
If you want to change the configuration, you need to 'input' more taps while the blinking signal is active, the number of taps specifies the action. Note that the timing is more relaxed in the config menu; you have to be swift and uninterrupted, but by far not as rapid as the 8 taps above. However you must hit the exact number of taps.
Some items in the programming menu have a submnu, indicated by a different blinking signal. You need to enter a nother sequence of taps then.
Once you entered the config menu (by 8 rapid taps) and see it's signal, tap the button a number of times to do the following:
- 1 tap: Mode lock; lock the selected mode (see above). If locked, unlock.
- 2 taps: Switch between the two groups (also lifts a mode lock).
- 3 taps: Set brightness. The light will ramp the brightness up and down twice in 24 visually linear steps: From #2 (moonlight) to #22 (100%) the output doubles every 2 steps, #1 (firefly) is even lower, #23 if half-turbo and #24 is full tubo. Tap once when the desired brightness is reached to change the selected mode to this brightness.
- 4 taps: Enter the strobe/blink submenu, another sequence of 1-4 taps selects the special lighing function:
- 1 tap: constant brightness (normal mode).
- 2 taps: strobe (fast and disorienting).
- 3 taps: beacon (a short blink every 4s).
- 4 taps: double-pulse blink with oscillating brightness, i.e. does not blink on and off, but instead oscillates between high and low brightness (so the light is never off then). Not going off allows better estimation of your position/distance, while the blinking catches attention. This function is intended for cycling purposes (being seen).
- 5 taps: Add/Delete submenu, another sequence of 1 or 2 taps chooses between add or delete a mode t/from the active mode group:
- 1 tap: add a mode. The new mode is inserted at the position of the selected mode. Example: If you have 3 modes, L/M/H (with M selected), then add a mode, the result is L/M/M/H, i.e. the selected mode is doubled, and the first of them is selected. It can then be changed by entering the config menu again.
- 2 taps: delete the current mode from the group.
- 6 taps: memory subenu, another sequence of 1-3 taps selects the memory type for the active group:
- 1 tap: Set the memory type to no-memory.
- 2 taps: Set the memory type to classic memory (cycle through all modes).
- 3 taps: Set the memory type to short-cycle memory (after memory kicked in, skip to first mode; see below).
- 7 taps: Temperature submenu, another sequence of 1-12 taps selects the set temperature (default is 60°C):
1:off 2:40°C 3:45°C 4:50°C 5:55°C 6:60°C 7:65°C 8:70°C 9:75°C 10:80°C 11:85°C 12:90°C - 10 taps: Reset all configuration options to their factory defauls.
- 12 taps: Toggle prog-lock, disables programming the light. Mode lock and switching between mode groups (1 or 2 taps in the config menu) will still work, also 12 taps again to unlock, but all other config options won't.
Table of ramp steps:
| step | 1 | 2 | 3 | 4 | 5 | 6 | 7 | 8 | 9 | 10 | 11 | 12 | 13 | 14 | 15 | 16 | 17 | 18 | 19 | 20 | 21 | 22 | 23 | 24 |
|---|---|---|---|---|---|---|---|---|---|---|---|---|---|---|---|---|---|---|---|---|---|---|---|---|
| current [mA] | 1.5 | 3.0 | 4.2 | 5.9 | 8.4 | 12 | 17 | 24 | 34 | 48 | 67 | 95 | 134 | 190 | 270 | 380 | 540 | 760 | 1075 | 1520 | 2150 | 3040 | more | even more |
| curent [%] | 0.05 | 0.1 | 0.14 | 0.2 | 0.3 | 0.4 | 0.6 | 0.8 | 1.1 | 1.5 | 2 | 3 | 5 | 7 | 9 | 13 | 18 | 25 | 35 | 50 | 71 | 100 | semi-turbo | turbo |
The steps 1 to 16 strongly profit form the higher efficiency at true lower currents, the luminous flux is thus a bit higher than the percentage values indicate.
The lowest values depend on hardware manufacturing variations and thus vary.
Short-cycle memory is a special UI that allows to have memory and many modes without the need to cycle through all of them.
With classic memory you have a few modes, and if you want to go back to the first mode, you have to cycle through the remaining modes.
With no memory, you always start at the 1st mode and don't always have to click through all the modes, but you have no memory.
With short-cycle memory, a mode is memorized (i.e. if the light is switched off for a while and then switched on again, it comes on in that previously used mode), but when you change modes again, it will restart in the first mode instead of the next mode, so you don't have to cycle through all the modes. This combines memory with the advantages of a no-memory-UI. It effectively hides every mode behind all it's predecessors and is very effective if you have your favourite modes in front and blinkies or other rarely used modes at the end. I call it "short-cycle memory" in contrast to the classic cycle-through-all-modes memory, but it was actually invented by sixty545 at BLF.
Product description, PCB design, and firmware © DrJones (2015)
Write a review
Your Name:Your Review: Note: HTML is not translated!
Rating: Bad Good
Enter the code in the box below:
Mountain Electronics LLC © 2024

